API(Graphql)に関する参考URL
subscriptionとmutationの機能の違いがわかった。subscriptionって、要は、「いいねボタン」とその通知みたいなもんで、押したら、フォローしている人全員に通知がいく、というようなことのために使うんだってことがわかった。
この考え方は、Udemyの「AWS AppSync & Amplify with React & GraphQL - 完全ガイド」のセクション20での説明が、以下のどのリンク記事よりもわかりやすかった。
GraphQLにおけるSubscription処理について(実装例: Amplify + AppSync)
@auth認証の書き方のルールはあちこちに影響する。
まずはschemaだ。所有者か、管理者か、それ以外か、そしてオプションか、オペレーションはどれにするか、この区別が必要。
そして、大切なのが、フロントエンドでqueryやmutationする場合。要は、パラメーターに「authMode: 'AMAZON_COGNITO_USER_POOLS'」が必要になる。
一覧をqueryする場合の、絞り込みの仕方。結論はフロントエンドのパラメーターに「filter」が必要。
さらに、そのfilterに対しても、ルールがある。これも、AppSyncを使えばわかる。
How to Filter List/Queries With AND/OR operators AWS Amplify JavaScript GraphQL
【Next.js, Amplify, GraphQL】 一覧データ取得と絞り込み方法
Create real-time applications via serverless WebSockets with new AWS AppSync GraphQL subscriptions filtering capabilities(AWS blog)
Enhanced subscription filtering(AWS)
Fetch data(公式)
Amplifyのgraphqlでqueryなりmutationなりするときの、フロントエンド側のコードの呼び出し順。地味にこれが守られてないとエラーになる。
graphqlを非同期でラップしてuseEffectで副作用している関数で独立して一つ作り、それを一度変数に入れ、それをステートに入れ、それをuseEffectの副作用で実行する、という順が大切。
その他、AmplifyのGraphQLがらみの気になる記事として
Advanced Workflows(公式 複雑な構成のとき)
DataStore with Amplify(公式 サーバーを使わずローカルでのデータストアってやつらしい)
Reactで、細かい部分でのイベントの型の違い。
Next.jsで、ページのみのカスタムフォントは禁止らしい。
AWS ログインから利用まで
■EC2インスタンスの設置からファイアーウォール設定まで全体の流れ
EC2インスタンスを設置
ーAMIの選択
ーインスタンスタイプの選択
ーインスタンスの詳細の設定
ーストレージの追加
ータグの追加
ーセキュリティグループの設定
ーSSHキーペアの設定
Apacheをインストール
ーSSHでサーバーにログイン
ーApacheをインストール
ファイアーウォールを設定
ーセキュリティグループのポート80番を開ける
ElasticIPアドレスの設定
- EC2インスタンス作成での、「手順7.確認」で生成するキーペアを、デスクトップとかにダウンロード(秘密鍵。○○.pem)。
SSH接続の準備。ダウンロードした秘密鍵のパーミッションを600に変更。
ターミナルで
chmod 600 ~/Desktop/aws-and-infra-ssh-key.pem
など。
AWSのEC2のダッシュボードに移動。メニューから「インスタンス」→「(鍵とあっている)インスタンス」にチェックを入れる。
- 「詳細」タブの、パブリック IPv4 アドレスをコピー。
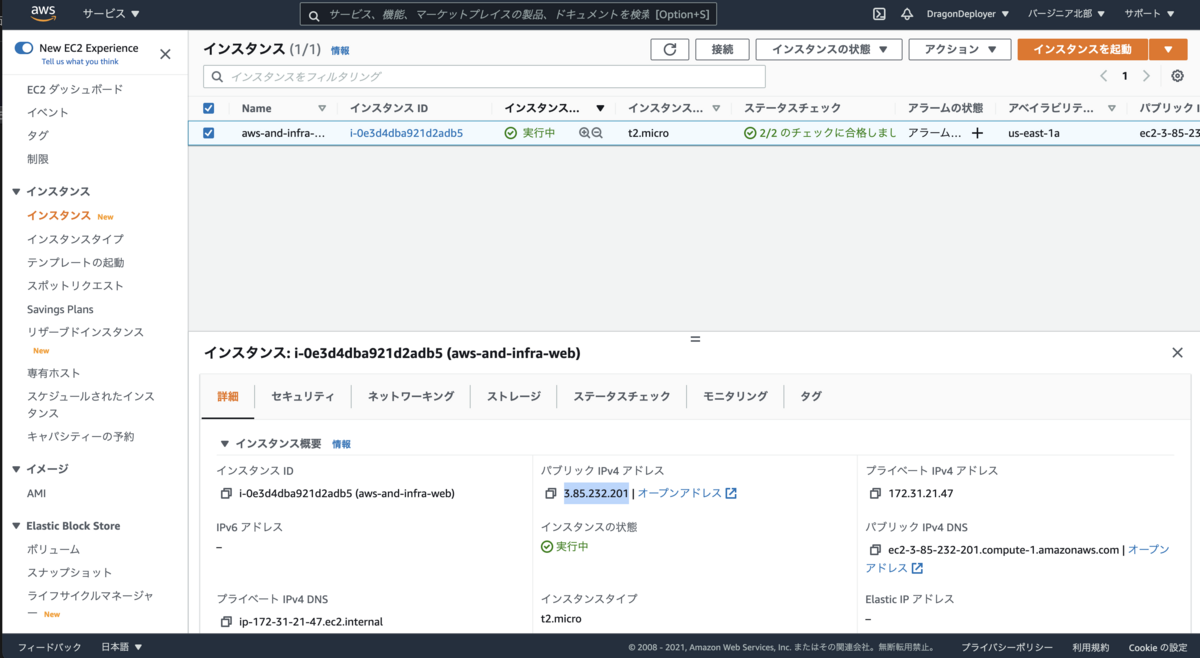
ターミナルで
ssh -i ~/Desktop/aws-and-infra-ssh-key.pem ec2-user@3.85.232.201
で
Are you sure you want to continue connecting (yes/no/[fingerprint])? yes
で

ターミナルで
exit
でログアウト。作業が終わったら、サーバーとの接続は切るようにする。
ポート番号を念の為確認。EC2に再度接続したら、ターミナルで
sudo lsof -i -n -P
でenterすると、どのポート番号でどのプログラムが待ち受けているか確認できる。-iはネットワークソケットファイルを表示するオプションで、サーバーの待機コードとプロセスを一覧にして表示。-nはIPアドレスをホスト名に変換しないオブション、-Pはポート番号をサービス名に変換しないオブション。これで、どのプログラムがどのポート番号で待ち受けているか知ることができる。

■(SSHでmacからAWSに接続し)Apacheをインストール
ターミナルで
sudo yum update -y
Apacheをインストール。
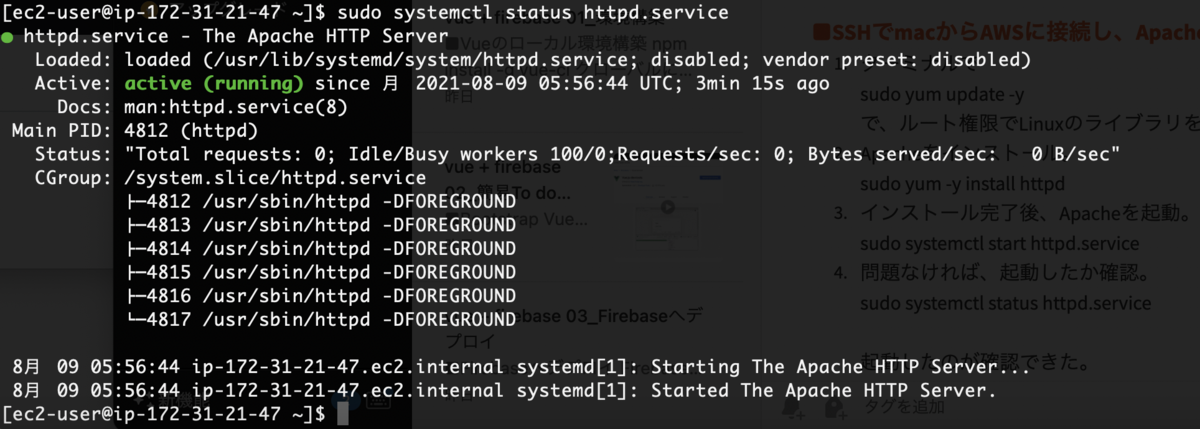
インストール完了後、Apacheを起動。
sudo systemctl start httpd.service
問題なければ、起動したか確認。
sudo systemctl status httpd.service
(補足)プロセスを確認するコマンド。
ps -axu
(補足)プロセスの絞り込み
サーバーを起動した時、Apacheも一緒に起動するよう設定。
sudo systemctl enable httpd.service
enable:自動設定の起動をする、という意味。
確認。
sudu systemctl is-enabled httpd.service
enableと出たら成功。
■(SSHでmacからAWSに接続し)Apacheをインストール

- セキュリティタブから、セキュリティグループの該当リンクをクリック。
- 画面右下あたりの「Edit inbound rules」をクリック

- インバウンドルールを編集 から「ルールの追加」をクリック。

- パブリックIPv4でうまくアパッチの画面が出たらOK
■Elastic IPアドレスの設定
- Elastic IP から「Elastic IPアドレスの割り当て」をクリック

- 次の画面で何も設定せずに「割り当て」をクリック
Ec2インスタンスに割り当てていく。
「アクション」から「アクションの関連づけ」をクリック

- 次の画面で インスタンス を選び、セレクトではクリックすれば自動的に関連するデータが出てくるので、それを選択し「関連づける」をクリック

- 設定完了したら、割り当てられたIPアドレスをブラウザのURLにコピペして確認
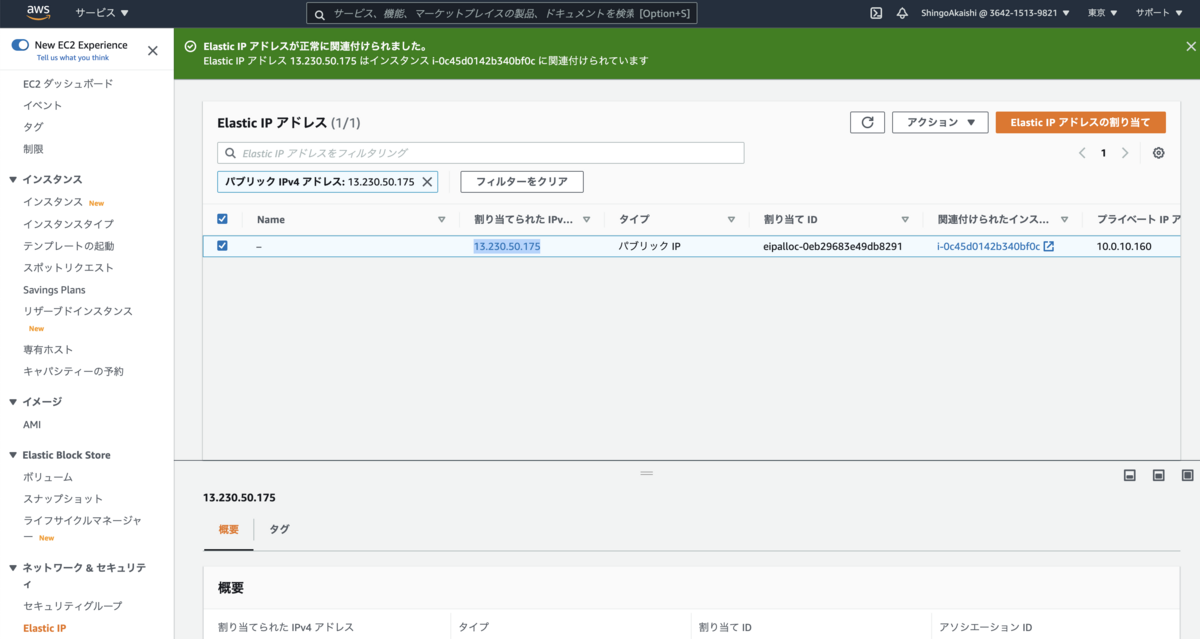
- 問題なければ完了。ただし、インスタンスに紐付けていなかったり自動停止した場合課金されてしまうので、終了したら「アクション」- 「Elastic IPアドレス 関連づけの解除」をクリック、さらに「アドレスの開放」をクリック。そうすると課金されなくなる。
■Route53設定後の関連づけ
- ホストゾーンの作成まで完了していることが前提。
- 関連づけるIPv4アドレスをコピーし、ターミナルでEC2にSSH接続。
ターミナルで
dig 対象ドメイン NS +short
で、お名前.comのネームサーバーが表示される。これはゾーンが委任されているから。IPアドレスを聞いたら、お名前.comが知っているよ、と返事したということ。

- このことから、お名前.comでネームサーバーをRoute53へ変更しなくてはならない、ということがわかる。
- お名前.comのネームサーバーの設定画面から「その他」を選び、Route53のネームサーバーの情報を出して置いて、一つ一つコピペして変更。72時間以内に反映されるらしい。。。

- 反映中の間に他のAレコードの設定をする。「レコードを作成」をクリック。
- 設定は以下のような感じ。

AWS 使い方の基本
■立ち上げ確認
- EC2にアクセスして、インスタンスが起動しているか確認する。
- Elastic IPを確認して、関連づけされているか確認する。
- RDSにアクセスして、データベースのステータスが利用可能になっているか確認する。
■SSHでアクセス
ターミナルで
ssh -i ~/.ssh/aws-and-infra-ssh-key.pem ユーザーネーム@00.000.00.000
でssh接続。
ターミナルで
mysql -h aws-and-infra-web.cr2moxdp4vzk.ap-northeast-1.rds.amazonaws.com -u root -p
でデータベース接続。
■データベース作成
ターミナルで
CREATE DATABASE aws_and_infra DEFAULT CHARACTER SET utf8 COLLATE utf8_general_ci;
で新規データベース作成。
ターミナルで
SHOW DATABASES;
で作成したデータベースの一覧を表示。
ターミナルで
CREATE USER 'aws_and_infra'@'%' IDENTIFIED BY 'password';
で、作りたいデータベース用のユーザーを作成。
@以降が接続元のホストを指しているが『%』でなんでもいいことを示している。
ユーザー名はaws_and_infra である。
IDENTIFIED BY で接続時のパスワードを示している。
パスワードはpassword である。
今作成したユーザーにデータベースを操作できる権限を付与。
ターミナルで、
GRANT ALL ON aws_and_infra.* TO 'aws_and_infra'@'%';
全ての権限を全てのテーブルに指定のユーザーに付与、という意味になる。
ここまでの設定はまだ反映されていない。
ターミナルで
FLUSH PRIVILEGES;
で設定が反映される。
設定が反映されたか確認。
ターミナルで
SELECT user , host FROM mysql.user;
で設定が反映されたか確認できる。
MySQLに接続できるか確認。
ターミナルで
exit;
で一度出る。
そして、ターミナルで
mysql -h aws-and-infra-web.cr2moxdp4vzk.ap-northeast-1.rds.amazonaws.com -u aws_and_infra -p
で、新しいユーザー名で接続。
使用しない時は接続を切断すること。
ターミナルで
exit;
でMySQLとEC2からログアウトしておく。
Cognito にユーザーがプールされたら、DynamoDBのUserテーブルにユーザー情報が追加され、AppSyncでクエリできるようにするには
要件は
- ユーザー閲覧機歴機能 (No.1) ユーザーとMovieのデータベースを紐づける
- ユーザー閲覧機歴機能 (No.2) ユーザーが閲覧したら、該当のサイドナビゲーションにチェックが付く
- ユーザー閲覧機歴機能 (No.3) ユーザーが閲覧したら、プロフィールに閲覧記録が書かれる
まずは、「1」の作成に必要な、全体工程は以下。
■「1. ユーザー閲覧機歴機能 (No.1) ユーザーとMovieのデータベースを紐づける工程の全体感
- Bitbucketへ、新たな空のリポジトリ「applat_release03」を作り、作業ディレクトリにクローンする。
Cognito -Lambda - DynamoDB - AppSync のトリガーフローが通った、新しい開発(公開)環境「applat-release03」を、新しいプロファイル「dev00003」で構築する。3. の環境に新しいnextプロジェクトと共に構築。
イベントは2つ。認証後とログイン後。
現在の開発環境「applat-release02」のデータベースのエクスポート先を、S3のパケットに作る。
- の「Movie」「Caption」(各言語分)のテーブルを全てエクスポート。
- で作成したパケットから、3. で新たに作った環境のDynamoDBへ、各言語のMovieとCaptionのデータをインポートする。
- で作った新しいローカル環境へ、「applat-release02」のフロントエンド部分を移行する。バックエンドに関わるsrcフォルダやAmplifyフォルダは絶対移動させないこと。
- で作った新しいリポジトリにpushする
- 全体をamplify push、そしてamplify publishする。
ここまでで、要件1 が完了する。
ここからは、
- -
Cognito -Lambda - DynamoDB - AppSync のトリガーフローが通った、新しい開発(公開)環境「applat-release03」を、新しいプロファイル「dev00003」で構築する。3. の環境に新しいnextプロジェクトと共に構築。
イベントは2つ。認証後とログイン後。
- -
について、記録していく。
■「2」Cognito -Lambda - DynamoDB - AppSync のトリガーフローについて
1. Amplify プロファイル設定
Amplify を使ったプロジェクト用のI AMユーザを、以下のコマンドで生成する。
amplify configure
そして、プロファイル名を設定。
2. Next.jsのインストール
next.jsフレームワークの新規作成
npx create-next-app .
3. 初期化
プロジェクトの初期化
amplify init
4. 最低限必要な依存関係のインストール
yarn add @aws-amplify/ui-react aws-amplify
4. AppSyncとUserテーブルほか必要なテーブルの作成
amplify add api
スキーマのコードは以下。
ここでauthを仕込んでおけば、次のamplify pushでauthのフローが始まる。
type User @model
@auth(
  rules: [
    {allow: groups, groups: ["Admin"]},
    {allow: owner, ownerField: "username", operations: [read]}
  ]
){
  id: ID!
  username: String
  email: String
  moviecheck: MovieCheck @hasOne
}
type MovieCheck @model
{
  id: ID!
  user: User @belongsTo
  checkuser: String
  checklist:[CheckList] @hasMany
}
type CheckList @model
{
  id: Int!
  lang: String!
  module: String!
  part: String!
  page: String!
  check: Boolean
  moviecheck: MovieCheck @belongsTo
}
type MovieEn @model
{
  id: ID!
  lang: String!
  module: String!
  part: String!
  page: String!
  url: String!
  pagetitle: String!
  playalltime: String!
  captions: [CaptionEn] @hasMany
  outurl: String
  outurltitle: String
  movieEnPlaymovieId: String!
}
type MovieInd @model
{
  id: ID!
  lang: String!
  module: String!
  part: String!
  page: String!
  url: String!
  pagetitle: String!
  playalltime: String!
  captions: [CaptionInd] @hasMany
  outurl: String
  outurltitle: String
  movieIndPlaymovieId: String!
}
type MovieVn @model
{
  id: ID!
  lang: String!
  module: String!
  part: String!
  page: String!
  url: String!
  pagetitle: String!
  playalltime: String!
  captions: [CaptionVn] @hasMany
  outurl: String
  outurltitle: String
  movieVnPlaymovieId: String!
}
type MovieTha @model
{
  id: ID!
  lang: String!
  module: String!
  part: String!
  page: String!
  url: String!
  pagetitle: String!
  playalltime: String!
  captions: [CaptionTha] @hasMany
  outurl: String
  outurltitle: String
  movieThaPlaymovieId: String!
}
type MovieTgl @model
{
  id: ID!
  lang: String!
  module: String!
  part: String!
  page: String!
  url: String!
  pagetitle: String!
  playalltime: String!
  captions: [CaptionTgl] @hasMany
  outurl: String
  outurltitle: String
  movieTglPlaymovieId: String!
}
type MovieRus @model
{
  id: ID!
  lang: String!
  module: String!
  part: String!
  page: String!
  url: String!
  pagetitle: String!
  playalltime: String!
  captions: [CaptionRus] @hasMany
  outurl: String
  outurltitle: String
  movieRusPlaymovieId: String!
}
type MovieNep @model
{
  id: ID!
  lang: String!
  module: String!
  part: String!
  page: String!
  url: String!
  pagetitle: String!
  playalltime: String!
  captions: [CaptionNep] @hasMany
  outurl: String
  outurltitle: String
  movieNepPlaymovieId: String!
}
type MovieKhm @model
{
  id: ID!
  lang: String!
  module: String!
  part: String!
  page: String!
  url: String!
  pagetitle: String!
  playalltime: String!
  captions: [CaptionKhm] @hasMany
  outurl: String
  outurltitle: String
  movieKhmPlaymovieId: String!
}
type MovieBur @model
{
  id: ID!
  lang: String!
  module: String!
  part: String!
  page: String!
  url: String!
  pagetitle: String!
  playalltime: String!
  captions: [CaptionBur] @hasMany
  outurl: String
  outurltitle: String
  movieBurPlaymovieId: String!
}
type MovieBen @model
{
  id: ID!
  lang: String!
  module: String!
  part: String!
  page: String!
  url: String!
  pagetitle: String!
  playalltime: String!
  captions: [CaptionBen] @hasMany
  outurl: String
  outurltitle: String
  movieBenPlaymovieId: String!
}
type CaptionEn @model
{
  id: ID!
  lang: String!
  module: String!
  part: String!
  page: String!
  content: Int
  startTime: String
  endTime: String
  body: String
  movie: MovieEn @belongsTo
  movieEnCaptionsId: String!
}
type CaptionInd @model
{
  id: ID!
  lang: String!
  module: String!
  part: String!
  page: String!
  content: Int
  startTime: String
  endTime: String
  body: String
  movie: MovieInd @belongsTo
  movieIndCaptionsId: String!
}
type CaptionVn @model
{
  id: ID!
  lang: String!
  module: String!
  part: String!
  page: String!
  content: Int
  startTime: String
  endTime: String
  body: String
  movie: MovieVn @belongsTo
  movieVnCaptionsId: String!
}
type CaptionTha @model
{
  id: ID!
  lang: String!
  module: String!
  part: String!
  page: String!
  content: Int
  startTime: String
  endTime: String
  body: String
  movie: MovieTha @belongsTo
  movieThaCaptionsId: String!
}
type CaptionTgl @model
{
  id: ID!
  lang: String!
  module: String!
  part: String!
  page: String!
  content: Int
  startTime: String
  endTime: String
  body: String
  movie: MovieTgl @belongsTo
  movieTglCaptionsId: String!
}
type CaptionRus @model
{
  id: ID!
  lang: String!
  module: String!
  part: String!
  page: String!
  content: Int
  startTime: String
  endTime: String
  body: String
  movie: MovieRus @belongsTo
  movieRusCaptionsId: String!
}
type CaptionNep @model
{
  id: ID!
  lang: String!
  module: String!
  part: String!
  page: String!
  content: Int
  startTime: String
  endTime: String
  body: String
  movie: MovieNep @belongsTo
  movieNepCaptionsId: String!
}
type CaptionKhm @model
{
  id: ID!
  lang: String!
  module: String!
  part: String!
  page: String!
  content: Int
  startTime: String
  endTime: String
  body: String
  movie: MovieKhm @belongsTo
  movieKhmCaptionsId: String!
}
type CaptionBur @model
{
  id: ID!
  lang: String!
  module: String!
  part: String!
  page: String!
  content: Int
  startTime: String
  endTime: String
  body: String
  movie: MovieBur @belongsTo
  movieBurCaptionsId: String!
}
type CaptionBen @model
{
  id: ID!
  lang: String!
  module: String!
  part: String!
  page: String!
  content: Int
  startTime: String
  endTime: String
  body: String
  movie: MovieBen @belongsTo
  movieBenCaptionsId: String!
}
3. プッシュとauth
amplify push
すると、authのフローが始まる。
? Are you sure you want to continue?

Yes
Do you want to use the default authentication and security configuration?

Manual configuration
Select the authentication/authorization services that you want to use:

User Sign-Up, Sign-In, connected with AWS IAM controls (Enables per-user Storage features for images or other content, Analyti
cs, and more)
Provide a friendly name for your resource that will be used to label this category in the project:

(そのままenter)
Enter a name for your identity pool.

(そのままenter)
Allow unauthenticated logins? (Provides scoped down permissions that you can control via AWS IAM)

No
 Do you want to enable 3rd party authentication providers in your identity pool?

No
Provide a name for your user pool:

(そのままenter)
 How do you want users to be able to sign in?

Username
Do you want to add User Pool Groups?

Yes
? Provide a name for your user pool group:

Admin
? Do you want to add another User Pool Group

No
✔ Sort the user pool groups in order of preference ·

Admin
Do you want to add an admin queries API?

No
Multifactor authentication (MFA) user login options:

OFF
Email based user registration/forgot password:

Enabled (Requires per-user email entry at registration)
Specify an email verification subject:

Your verification code
Specify an email verification message:

Your verification code is {####}
 Do you want to override the default password policy for this User Pool?

No
What attributes are required for signing up?

Email
Specify the app's refresh token expiration period (in days):

7
 Do you want to specify the user attributes this app can read and write?

No
Do you want to enable any of the following capabilities?

(何も選ばずそのままenter)
Do you want to use an OAuth flow?

No
ここでやっとLambdaとの連携話が登場!
? Do you want to configure Lambda Triggers for Cognito?

Yes
? Which triggers do you want to enable for Cognito

Post Confirmation
? What functionality do you want to use for Post Confirmation

Create your own module
? Do you want to edit your custom function now?

Yes
これで、Lambda用のcustom.jsが立ち上がるので、以下の通り入れる。
 var aws = require('aws-sdk');
 var ddb = new aws.DynamoDB();
 exports.handler = async (event, context) => {

     let date = new Date();
     if (event.request.userAttributes.sub) {
         let params = {
             Item: {
                 'id': {S: event.request.userAttributes.sub},
                 '__typename': {S: 'User'},
                 'username': {S: event.userName},
                 'email': {S: event.request.userAttributes.email},
                 'createdAt': {S: date.toISOString()},
                 'updatedAt': {S: date.toISOString()},
             },
             TableName: process.env.USERTABLE
         };
         // Call DynamoDB
         try {
             await ddb.putItem(params).promise()
             console.log("Success");
         } catch (err) {
             console.log("Error", err);
         }
         console.log("Success: Everything executed correctly");
         context.done(null, event);
     } else {
         // Nothing to do, the user's email ID is unknown
         console.log("Error: Nothing was written to DynamoDB");
         context.done(null, event);
     }
 };
上記が立ち上がると
? Do you want to generate code for your newly created GraphQL API

Yes
GraphQL endpoint: https://5oessai6vbfgdfwc7kcgmydika.appsync-api.ap-northeast-1.amazonaws.com/graphql
GraphQL API KEY: da2-w7uygek4yjhutlsyyuqbq2uihq
4. Amplifyのコンソール画面から
amplify console
「AppSyncで表示」をクリック

DynamoDBの基本文法
参考URL
https://www.wakuwakubank.com/posts/639-aws-dynamodb-introduction/
特徴
- Key-Value型のNoSQLデータベースサービス
- 事実上無制限のスループットとストレージ
- 管理作業をまかせられる
- DynamoDBストリーム をトリガーとしたLambadaの実行
- 項目の追加、変更、削除をイベントとして検出
- キャパシティーユニット による利用量の事前に設定が可能
- 1秒あたりの 読み込み 書き込み の回数上限を決めて料金が決定される
構成要素( Table, Item, Attribute )
RDSと比較すると以下のようになります。
| DynamoDB | RDS |
|---|---|
| テーブル(Table) | テーブル |
| 項目(Item) | レコード |
| 属性(Attribute) | カラム |
プライマリキー
セカンダリインデックス
DynamoDBへのデータインポート
作業するマシンに、AWS CLIがインストールされているかを確認。
(参考)https://docs.aws.amazon.com/ja_jp/amazondynamodb/latest/developerguide/Tools.CLI.html
テーブルを作成する前に、スキーマを作成するなど、構造が決まっていることが望ましい。
■DynamoDBにテーブルを作成
以下は作成の仕方の一例。
(参考URL)
- DynamoDB コンソール (https://console.aws.amazon.com/dynamodb/) を開きます。
- [テーブルの作成] を選択します。
- [DynamoDB テーブルの作成] 画面で、次の操作を行います。
- [テーブル名] ボックスに、「Forum」と入力します
- [プライマリキー] の [パーティションキー] ボックスに「Name」と入力します。データ型を [文字列] に設定します。
- すべての設定が正しいことを確認したら、[作成] を選択します。
■アクセスキーとシークレットキーとリージョンの確認
(参考URL)https://qiita.com/kaito_program/items/7b9ba489e44d2295cf6f
aws configure listコマンドを叩いて、アクセスキーとシークレットキーとリージョンが何と設定されてるか確認。
aws configure list
必ず、データをインポート前に、最初にこちらの操作を行い、ログインしているI AMと、それに紐づくDynamoDBのリージョン、そのI AMとアクセスキー&シークレットキーを確認する。
そして、5分くらいで、アクセスキーとシークレットキーは「デフォルト」に戻ってしまう(セキュリティー上の仕様のようだ)ので、以下のコマンドで変更する。
export AWS_ACCESS_KEY_ID=****hogehoge*****
export AWS_SECRET_ACCESS_KEY=****hanihani*****
その後、PCの設定ファイルを変更
~/.zshrc
再度aws configure listを叩いてキー2つを確認する。
aws configure list
この後、5分以内に、再起動しないで、すぐに作業。
■データをテーブルにロード(インポート)
(参考URL)https://docs.aws.amazon.com/ja_jp/amazondynamodb/latest/developerguide/SampleData.LoadData.html
(サンプルjson)
インポートするjsonデータが入っているディレクトリに移動し、以下のコマンドを実行。
aws dynamodb batch-write-item --request-items file://ファイル名.json
成功すると
{
    "UnprocessedItems": {}
}
とターミナルに出力される。
※その他
「パイプライン」を使う手もあるようだ。こちらは未だテストしていない。
Schemaを修正した場合のアップデートの仕方
何度schemaを修正してから、Amplifyのバックエンドが壊れ、その度に初期構築からやり直しをしてきただろう。。。
特にCognitoが絡んできてからは、頻繁に起こった。
ようやく、schemaを修正してから、amplifyのアップデートの仕方がわかった!!
まずは、schemaを修正。
でも、ここの作りは、AppSync & DynamoDBとモロに関連するので、できれば複数の環境でテストできた方が安全。
次に、ステータスを確認
amplify status
api の欄がupdateとなっていれば確認完了。
ここがポイント!
次に、スキーマを再実行して更新。
amplify codegen models
公式サイトより、
「これにより、変更が評価され、基になるデバイス上のストレージ構造に影響を与える変更が検出された場合は、バージョン管理されたハッシュが作成されます。たとえば、タイプが追加/削除されたり、フィールドが必須/オプションになったりします。DataStore は起動時にこのバージョンを評価し、変更がある場合はデバイスのローカル アイテムが削除され、クラウドと同期している場合はAppSync からの完全同期が行われます。」
とのこと。
更新完了後、念の為ステータスを確認。
amplify status
まだapi の欄はupdateとなっているはず。
ここでプッシュ
amplify push
を実行。するとエラーが出て、
「An error occurred when pushing the resources to the cloud
🛑 An error occurred during the push operation: /
Removing a model from the GraphQL schema will also remove the underlying DynamoDB table.
This update will remove table(s) [CheckListTable]
ALL EXISTING DATA IN THESE TABLES WILL BE LOST!
If this is intended, rerun the command with '--allow-destructive-graphql-schema-updates'.」
(翻訳)
「リソースをクラウドにプッシュするときにエラーが発生しました
🛑 プッシュ操作中にエラーが発生しました: /
GraphQL スキーマからモデルを削除すると、基礎となる DynamoDB テーブルも削除されます。
この更新によりテーブルが削除されます [CheckListTable]
これらのテーブルの既存のデータはすべて失われます。
これが意図されている場合は、'--allow-destructive-graphql-schema-updates' を指定してコマンドを再実行してください。」
と出る。
初回であれば、最後に
amplify push -allow-destructive-graphql-schema-updates
と実行。
これで、Amplifyのバックグラウンドを壊すことなく、AppSync & DynamoDB のテーブル構造の修正&更新ができる!
※これは「1度」成功すれば、2回目からはamplify push だけで行けた。 手順の順番を守ことが重要みたい。
■アプリケーションを壊すやり方
3つある。どれが先でも、どちらか一つでも、壊れた。。。(AppSyncが効かなくなった)。
2度と、繰り返すことのないようにしたい!
1 schema修正後、
amplify push --y
をいきなり実行すること。
2 これも意味わからず
amplify update api
を実行すること。
3 DynamoDBのテーブルを手動で削除すること。
■理屈的なこと
以下はAppSyncとDynamoDBの仕組みの関係である。
