スキーマーの更新の仕方
テーブル名を間違えた。。。なんてことになった場合の修正の仕方。
やると危険なのが、「いきなり最初にDynamoDB」のデータベースを消してしまうこと。
AppSyncとDynamoDBの仕組みの関係が大いにある。

リレーションシップとスキーマ
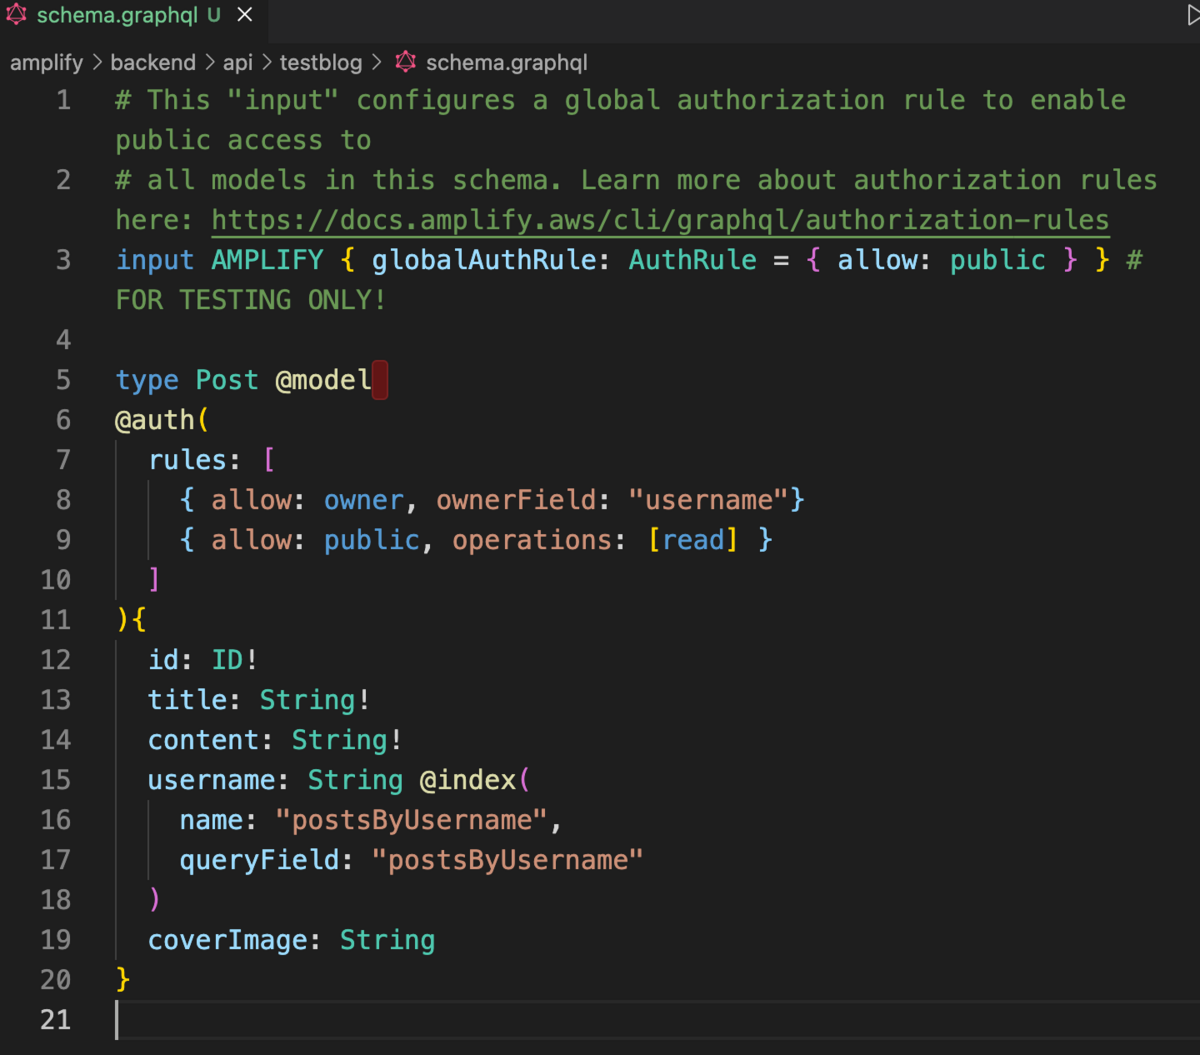
■@modelとは?
https://docs.amplify.aws/cli-legacy/graphql-transformer/model/
@model注釈が付けられたオブジェクトタイプは、生成されたAPIの最上位エンティティです。@model注釈が付けられたオブジェクトは、AmazonDynamoDBに保存され、@authを介して保護され、@searchableを介して他のオブジェクトに関連付けられ、@connectionAmazonOpenSearchにストリーミングされます。@versionedディレクティブを適用して 、バージョンフィールドと競合検出をモデルタイプに即座に追加することもできます。
1つの@modelディレクティブで、次のAWSリソースを設定します。
- デフォルトでPAY_PER_REQUEST課金モードが有効になっているAmazonDynamoDBテーブル。
- 上記のテーブルにアクセスするように設定されたAWSAppSyncデータソース。
- AWSAppSyncがお客様に代わって上記のテーブルを呼び出すことを可能にするデータソースにアタッチされたAWSIAMロール。
- 最大8つのリゾルバー(作成、更新、削除、取得、リスト、onCreate、onUpdate、onDelete)ですが、これは@modelディレクティブのqueries、、、mutationsおよびsubscriptions引数を介して構成できます。
- ミューテーションを作成、更新、および削除するための入力オブジェクト。
- リストクエリおよび接続フィールドのオブジェクトをフィルタリングできるようにする入力オブジェクトをフィルタリングします。
- リストクエリの場合、返されるオブジェクトのデフォルト数は100です。limit引数を設定することで、この動作をオーバーライドできます。
■@auth とは?
https://docs.amplify.aws/cli-legacy/graphql-transformer/auth/
アプリケーションがGraphQLAPIと対話するには、承認が必要です。
APIキーは、パブリックAPI(またはパブリックにしたいスキーマの一部)またはプロトタイピングに最適です。デプロイする前に有効期限を指定する必要があります。
IAM承認では、署名バージョン4を使用して、ロールに関連付けられたポリシーを使用してリクエストを行います。
AmazonCognitoユーザープールまたはサードパーティのOpenIDConnectプロバイダーによって提供されるOIDCトークンも承認に使用できます。これを有効にするだけで、ユーザーがAPIアクションへのトップレベルのアクセスを許可されるように認証する必要がある単純なアクセス制御が提供されます。
これらのトークンの一部として提供された、またはデータベースアイテム自体に設定された認証メタデータを活用するスキーマ上で@authを使用して、よりきめ細かいアクセス制御を設定できます。
@auth注釈が付けられたオブジェクトタイプは、APIの最上位の承認よりも追加の制御を提供する一連の承認ルールによって保護されます。プロジェクトのスキーマのオブジェクトタイプ定義とフィールド定義に、@authディレクティブを使用できます。
@modelアノテーションも付けられたオブジェクトタイプ定義で@authディレクティブ を使用すると、そのタイプのオブジェクトを返すすべてのリゾルバーが保護されます。フィールド定義でディレクティブを使用する @authと、親タイプで見つかった属性に基づいてアクセスを許可するリゾルバーがフィールドに追加されます。
■rules(@auth(rules:〜)
@authディレクティブを使用して、パブリック、サインインユーザー、ユーザーごと、およびユーザーグループごとのデータアクセスの承認ルールを構成します。承認ルールは、デフォルトで拒否の原則に基づいて機能します。
つまり、許可ルールが特に構成されていない場合、それは拒否されます。
上記のAWSでのルールの前提で、以下のコードを改めて見てみる。
AWS基礎学習
■(必須)初期設定をする
ログイン(アカウントの作成は済み)
料金アラートの設定
IAM(Identity and Access Management (IAM))で作業用ユーザーを作成
CloudTrailで操作ログを記録
■(ドメインを取得後、必要)Route53 ドメインを登録
ドメインの購入
Route53でDNSを設定
/*------------------------------------------------------
Webサーバーを使ったやり方
- -----------------------------------------------------*/
■VPCネットワークを構築
IPアドレスを決める
VPCを作成
サブネットを作成
ルーティングを設定
■EC2 Webサーバーを構築
EC2インスタンスを設置
Apacheをインストール
ファイアーウォールを設定
■RDS DBサーバーを構築
プライベートサブネットを作成
RDSを設置
WebサーバーからRDSに接続
そのほか、ECS、ECR、Fargate、Javascript SDK、をはじめ、
様々なバックエンドの設定が必要
/*------------------------------------------------------
サーバーレスのやり方
- -----------------------------------------------------*/
■Amplify
(別ページ参照)
/*------------------------------------------------------
主にWebサーバーを使ったやり方での
参考URL(Amazon)
- -----------------------------------------------------*/
■AWS SDK for JavaScript
https://aws.amazon.com/jp/sdk-for-javascript/
■AWS での JavaScript
https://aws.amazon.com/jp/developer/language/javascript/?nc1=f_dr
■AWSFargate の Amazon ECS
https://docs.aws.amazon.com/ja_jp/AmazonECS/latest/developerguide/AWS_Fargate.html
■Amazon Elastic Container Registry とは
https://docs.aws.amazon.com/ja_jp/AmazonECR/latest/userguide/what-is-ecr.html?pg=ln&sec=hs
■Code Pipeline プロジェクトを作成
https://ap-northeast-1.console.aws.amazon.com/codesuite/codepipeline/start?region=ap-northeast-1
/*------------------------------------------------------
主にWebサーバーを使ったやり方での
参考URL(別サイト)
- -----------------------------------------------------*/
Aws Code PipelineでReactjs/Nextのデプロイを自動化!ECSへ展開してみました
https://www.ragate.co.jp/blog/articles/2200
【AWS Lambdaとは?】初心者にもわかりやすく解説
https://www.wafcharm.com/blog/aws-lambda-for-beginners/
https://ap-northeast-1.console.aws.amazon.com/ecs/home?region=ap-northeast-1#/getStarted
https://docs.aws.amazon.com/ja_jp/AmazonECS/latest/developerguide/Welcome.html
https://docs.aws.amazon.com/ja_jp/AmazonECS/latest/developerguide/docker-basics.html
https://zenn.dev/mame_06/articles/5ed6039a3a300b
https://www.ragate.co.jp/blog/articles/2200
https://cloudbees.techmatrix.jp/jenkins/
https://business.ntt-east.co.jp/content/cloudsolution/column-try-37.html
https://qiita.com/sugurutakahashi12345/items/dc23dab2613b0e6103e8
Electron 基礎
これが一番確かだった。
https://github.com/saltyshiomix/nextron
react-draft-wysiwyg
https://github.com/jpuri/react-draft-wysiwyg
https://www.npmjs.com/package/react-draft-wysiwyg
https://www.electronjs.org/docs/latest/tutorial/tutorial-packaging
https://www.electronjs.org/docs/latest/api/window-open
https://qiita.com/torisankanasan/items/983f4dae01090296e6d3
https://zenn.dev/erukiti/articles/933fc127f751aef45b4f
https://draftjs.org/docs/quickstart-api-basics
https://qiita.com/NozomuTsuruta/items/bb023a6f5bf6be3b3217
https://www.electronjs.org/ja/docs/latest/api/browser-window
https://blog.capilano-fw.com/?p=2593
https://www.electronjs.org/docs/latest/tutorial/tutorial-adding-features
https://zenn.dev/toono_f/articles/bd50ddd0a7bc76
https://morioh.com/p/29cf922e1f56
Electron Fiddle
https://www.electronjs.org/fiddle
Electron 公式
https://www.electronjs.org/ja/docs/latest/
Reactのスタイリングあれこれ
https://zenn.dev/chiji/articles/b0669fc3094ce3
Electron x Next.js でTodoアプリを作る
https://zenn.dev/tsuemura/scraps/f0bf7f8e7cb51a
Next.js + Electron がとても簡単になっていた
https://zenn.dev/erukiti/articles/933fc127f751aef45b4f
Electron with Typescript application example
https://github.com/vercel/next.js/tree/canary/examples/with-electron-typescript
Next.jsのexamples
Electron入門 ~ Webの技術でつくるデスクトップアプリ
https://zenn.dev/sprout2000/books/6f6a0bf2fd301c
Electron API レシピブック 2021
■
Webpack環境下でBootstrapを使いながら、SassやJavascriptを使って簡単なフォーム作成
環境構築
npm init で初期化
→ディレクトリを作り、npm initで初期化
→package.jsonをひたすらenterでつくる
必要なnpmをインストール(今回はpug、sassを使う前提)
→一気にインストール(npm i -D パッケージ名)
npm i -D webpack@5.37.1 webpack-cli@4.7.0 webpack-dev-server@3.11.2 @babel/core@7.14.3 @babel/preset-env@7.14.2 autoprefixer@10.2.5 babel-loader@8.2.2 clean-webpack-plugin@4.0.0-alpha.0 css-loader@5.2.4 file-loader@5.0.2 html-loader@2.1.2 html-webpack-plugin@5.3.1 image-webpack-loader@7.0.1 mini-css-extract-plugin@1.3.4 postcss@8.2.15 postcss-loader@5.3.0 pug-html-loader@1.1.5 resolve-url-loader@^4.0.0 sass@1.32.13 sass-loader@11.1.1 style-loader@2.0.0 url-loader@3.0.0
- さらに、bootstrap関連のnpmもインストール(bootstrapは4.5.3を使う前提)
npm i -D bootstrap@4.5.3 jquery@3.5.1 popper.js@1.16.0 @popperjs/core@2.9.2
  "scripts": {
    "start": "npx webpack serve --mode=development",
    "build": "webpack --mode=development",
    "build:dev": "webpack"
  },
- package.jsonの修正形はこちら(mainファイルをリネームしているのに注意)
{
  "name": "test2",
  "version": "1.0.0",
  "description": "",
  "main": "main.js",
  "scripts": {
    "start": "npx webpack serve --mode=development",
    "build": "webpack --mode=development",
    "build:dev": "webpack"
  },
  "author": "",
  "license": "ISC",
  "devDependencies": {
    "@babel/core": "^7.14.3",
    "@babel/preset-env": "^7.14.2",
    "animejs": "^3.2.1",
    "autoprefixer": "^10.2.5",
    "babel-loader": "^8.2.2",
    "clean-webpack-plugin": "^4.0.0-alpha.0",
    "css-loader": "^5.2.4",
    "ejs-html-loader": "^4.0.1",
    "file-loader": "^5.0.2",
    "gsap": "^3.6.1",
    "html-loader": "^2.1.2",
    "html-webpack-plugin": "^5.3.1",
    "image-webpack-loader": "^7.0.1",
    "mini-css-extract-plugin": "^1.3.4",
    "postcss": "^8.2.15",
    "postcss-loader": "^5.3.0",
    "pug-html-loader": "^1.1.5",
    "resolve-url-loader": "^4.0.0",
    "sass": "^1.32.13",
    "sass-loader": "^11.1.1",
    "style-loader": "^2.0.0",
    "url-loader": "^3.0.0",
    "vue": "^2.6.12",
    "vue-cli": "^2.9.6",
    "vue-loader": "^15.9.7",
    "vue-template-compiler": "^2.6.12",
    "webpack": "^5.37.1",
    "webpack-cli": "^4.7.0",
    "webpack-dev-server": "^3.11.2"
  },
  "dependencies": {
    "bootstrap": "^4.5.3",
    "jquery": "^3.5.1",
    "popper.js": "^1.16.0",
    "@popperjs/core": "^2.9.2",
  }
}
- 作業ディレクトリをつくる(dist→コンパイル後、src→コンパイル前の作業用)
srcフォルダ内のディレクトリをつくる
→css(オリジナルのsassを入れていく)
→images(画像など)
→js(オリジナルのjavascript関連)
→templates(htmlやpugを入れる)
webpack.config.jsをつくる(設定ファイル)
→ルートディレクトリにwebpack.config.jsという名前で空のjsファイルをつくる
→コアになるwebpack.config.jsの最初の状態は以下。
const path = require('path');
module.exports = {
  entry: './src/index.js',
  output: {
    path: path.resolve(__dirname, './dist'),
  },
};
- さらに、npmでインストールしていったパッケージを入れていって、整理していったものがこちら
const path = require('path');
const MiniCssExtractPlugin = require('mini-css-extract-plugin');
const HtmlWebpackPlugin = require('html-webpack-plugin');
const { CleanWebpackPlugin } = require('clean-webpack-plugin');
module.exports = {
  mode: 'development',
  entry: {
    main: './src/js/main.js'
  },
  output: {
    path: path.resolve(__dirname, './dist'),
    filename: 'js/main.js',
  },
  module: {
    rules: [
      {
        test: /\.js/,
        exclude: /node_modules/,
        use: [
          {
            loader: 'babel-loader',
            options: {
              presets: [
                ['@babel/preset-env', { "targets": "> 0.25%, not dead" }],
              ],
            },
          },
        ],
      },
      {
        test: /\.scss$/,
        use: [
          {
            // loader: 'style-loader',
            loader: MiniCssExtractPlugin.loader, // 追加
          },
          {
            loader: 'css-loader',
            options: {
              url: false,
              sourceMap: true,
              importLoaders: 2,
            },
          },
          {
            loader: "postcss-loader",
            options: {
              sourceMap: true,
              postcssOptions: {
                plugins: ["autoprefixer"],
              },
            },
          },
          {
            loader: "sass-loader",
            // options: {
            //   sourceMap: true,
            // },
          },
        ],
      },
      {
        test: /\.(gif|png|jpg|svg)$/,
        type: 'asset/resource',
        generator: {
          filename: 'images/[name][ext]',
        },
        use: [
          // {
          //   loader: 'file-loader',
          //   options: {
          //     esModule: false,
          //     name: 'images/[name].[ext]',
          //   },
          // },
          {
            loader: 'image-webpack-loader',
            options: {
              mozjpeg: {
                progressive: true,
                quality: 65,
              },
            },
          },
        ],
      },
      {
        test: /\.pug/,
        use: [
          {
            loader: 'html-loader',
          },
          {
            loader: 'pug-html-loader',
            options: {
              pretty: true,
            }
          },
        ],
      },
    ],
  },
  plugins: [
    new HtmlWebpackPlugin({
      template: './src/templates/index.pug',
      filename: "index.html",
    }),
    new CleanWebpackPlugin(),
  ],
  devtool: "source-map",
  target: ["web", "es5"],
  stats: {
    children: true,
  },
};
src/jsへmain.jsをつくる
→とりあえず空で
→JavascriptやjQuery デバックでじりじり修正 console.log
→モジュール化の考え。exportの外部ファイルをimport
import costom from './costom.js';
export default () => {
}
- 新規でindex.pugをつくる
doctype html
html
  body
    h1 My Site
    p Welcome to my super lame site.
const path = require('path');
const MiniCssExtractPlugin = require('mini-css-extract-plugin');
const HtmlWebpackPlugin = require('html-webpack-plugin');
const { CleanWebpackPlugin } = require('clean-webpack-plugin');
module.exports = {
  mode: 'development',
  entry: {
    main: './src/js/main.js'
  },
  output: {
    path: path.resolve(__dirname, './dist'),
    filename: 'js/main.js',
  },
  module: {
    rules: [
      {
        test: /\.js/,
        exclude: /node_modules/,
        use: [
          {
            loader: 'babel-loader',
            options: {
              presets: [
                ['@babel/preset-env', { "targets": "> 0.25%, not dead" }],
              ],
            },
          },
        ],
      },
      {
        test: /\.scss$/,
        use: [
          {
            // loader: 'style-loader',
            loader: MiniCssExtractPlugin.loader, // 追加
          },
          {
            loader: 'css-loader',
            options: {
              url: false,
              sourceMap: true,
              importLoaders: 2,
            },
          },
          {
            loader: "postcss-loader",
            options: {
              sourceMap: true,
              postcssOptions: {
                plugins: ["autoprefixer"],
              },
            },
          },
          {
            loader: "sass-loader",
            // options: {
            //   sourceMap: true,
            // },
          },
        ],
      },
      {
        test: /\.(gif|png|jpg|svg)$/,
        type: 'asset/resource',
        generator: {
          filename: 'images/[name][ext]',
        },
        use: [
          // {
          //   loader: 'file-loader',
          //   options: {
          //     esModule: false,
          //     name: 'images/[name].[ext]',
          //   },
          // },
          {
            loader: 'image-webpack-loader',
            options: {
              mozjpeg: {
                progressive: true,
                quality: 65,
              },
            },
          },
        ],
      },
      {
        test: /\.pug/,
        use: [
          {
            loader: 'html-loader',
          },
          {
            loader: 'pug-html-loader',
            options: {
              pretty: true,
            }
          },
        ],
      },
    ],
  },
  plugins: [
    new MiniCssExtractPlugin({
      filename: './css/style.css',
    }),
    new HtmlWebpackPlugin({
      template: './src/templates/index.pug',
      filename: "index.html",
    }),
    new CleanWebpackPlugin(),
  ],
  devtool: "source-map",
  target: ["web", "es5"],
  stats: {
    children: true,
  },
};
- src/main.jsへsassが読み込まれるようにする
import '../css/style.scss'
sassの動作チェック
→Sassのネスト構造
→Sassの変数
→Sassのループ
bootstrapが使えるようにする(sass側)
→sass.scssにインポート
@import "~bootstrap/scss/bootstrap.scss";
- bootstrapが使えるようにする(webpack.config.js)
const webpack = require('webpack');
  plugins: [
    new webpack.ProvidePlugin({
      $: 'jquery',
      jQuery: 'jquery',
      'window.jQuery': 'jquery'
    }),
const webpack = require('webpack');
const path = require('path');
const MiniCssExtractPlugin = require('mini-css-extract-plugin');
const HtmlWebpackPlugin = require('html-webpack-plugin');
const { CleanWebpackPlugin } = require('clean-webpack-plugin');
module.exports = {
  mode: 'development',
  entry: {
    main: './src/js/main.js'
  },
  output: {
    path: path.resolve(__dirname, './dist'),
    filename: 'js/main.js',
  },
  module: {
    rules: [
      {
        test: /\.js/,
        exclude: /node_modules/,
        use: [
          {
            loader: 'babel-loader',
            options: {
              presets: [
                ['@babel/preset-env', { "targets": "> 0.25%, not dead" }],
              ],
            },
          },
        ],
      },
      {
        test: /\.scss$/,
        use: [
          {
            // loader: 'style-loader',
            loader: MiniCssExtractPlugin.loader, // 追加
          },
          {
            loader: 'css-loader',
            options: {
              url: false,
              sourceMap: true,
              importLoaders: 2,
            },
          },
          {
            loader: "postcss-loader",
            options: {
              sourceMap: true,
              postcssOptions: {
                plugins: ["autoprefixer"],
              },
            },
          },
          {
            loader: "sass-loader",
            // options: {
            //   sourceMap: true,
            // },
          },
        ],
      },
      {
        test: /\.(gif|png|jpg|svg)$/,
        type: 'asset/resource',
        generator: {
          filename: 'images/[name][ext]',
        },
        use: [
          // {
          //   loader: 'file-loader',
          //   options: {
          //     esModule: false,
          //     name: 'images/[name].[ext]',
          //   },
          // },
          {
            loader: 'image-webpack-loader',
            options: {
              mozjpeg: {
                progressive: true,
                quality: 65,
              },
            },
          },
        ],
      },
      {
        test: /\.pug/,
        use: [
          {
            loader: 'html-loader',
          },
          {
            loader: 'pug-html-loader',
            options: {
              pretty: true,
            }
          },
        ],
      },
    ],
  },
  plugins: [
    new webpack.ProvidePlugin({
      $: 'jquery',
      jQuery: 'jquery',
      'window.jQuery': 'jquery'
    }),
    new MiniCssExtractPlugin({
      filename: './css/style.css',
    }),
    new HtmlWebpackPlugin({
      template: './src/templates/index.pug',
      filename: "index.html",
    }),
    new CleanWebpackPlugin(),
  ],
  devtool: "source-map",
  target: ["web", "es5"],
  stats: {
    children: true,
  },
};
- bootstrapが使えるようにする(main.js)
import "popper.js"
import "bootstrap"
bootstrapの公式サイトを見て見る
https://getbootstrap.jp/docs/4.5/getting-started/introduction/
試しにいろいろ組み立ててフォームを組み立ててみる
Bootstrapでフォームを組み立てる
フォームのデザインと潮流
気をつけたいUX・UI
フォームのコーディングでの要注意事項
value属性について
今までの知識を応用して、ライブラリをインストールして、カスタマイズできる状態にしてみよう
→最初にすべきことは?
→node.jsを動かすということは?
→gulpはタスクランナー。webpackと似ている。
どうしてWebpackが必要か?(座学)
- Node.jsとはなにか?なぜみんな使っているのか?https://qiita.com/non_cal/items/a8fee0b7ad96e67713eb
GitHub、Node.jsのパッケージ管理とJavaScriptの開発エコシステムを提供するnpmの買収締結を発表
https://www.sankeibiz.jp/business/news/200323/prl2003231714129-n1.htm
どうしてモジュールが必要?パッケージマネージャー(npm)
コンパイラ(babel)、モジュールバンドラー(webpack)、それが解決すること
フレームワークの台頭(Vue.js、Anglar、React)と仮想DOM
今後を見据えて。SPAやアプリケーション開発でのデザイン/フロントエンド
https://devlog.grapecity.co.jp/spa-javascript-framework-in-2020/
参考書籍URL
フロントエンド開発入門 プロフェッショナルな開発ツールと設計・実装
■
■stateをオブジェクトとしてまとめて取り扱うプロセス
import { useState } from "react";

export default function App() {
  const [state, setState] = useState({
    pip: false,
    playing: true
  });

  return (
    <div className="App">
      <p>あああ</p>
    </div>
  );
}
このようにstateをオブジェクト形式で表した場合、例えば、
console.log(state);
とすると、
{pip: false, playing: true}
となって返ってくる。
なので、個別に取得したかったら
console.log(pip.state);
などとする必要がある。
そこで、
  const {
    pip,
    playing
  } = state;
とすると、
console.log(pip);
でpipキーのvalueが取れるようになる。
■スプレッド構文(spread syntax)について改めて理解
const arr = [1, 2, 3]
という数値だけが入ったシンプルな配列を見てみる。
これをスプレッド構文(...)で「展開」してみると
console.log(...arr)
//1 2 3
とコンソールで表示される。
このことを「配列構造とオブジェクト構造を展開する」と言うらしい。
これを試しに
const arr1 = ...arr
とすると、
SyntaxError: /src/App.js: Unexpected token, expected "," (22:2)
となる。
このことは、スプレッド構文(...)を定義している以下の仕様に基づくことになる。
「The spread (...) syntax allows an iterable, such as an array or string, to be expanded in places where zero or more arguments (for function calls) or elements (for array literals) are expected.
(スプレッド (...) 構文を使用すると、配列や文字列などのイテラブルを、0 個以上の引数 (関数呼び出しの場合) または要素 (配列リテラルの場合) が期待される場所に展開できます。)」
つまり、スプレッド構文が使える場所は、引数か、配列、そしてオブジェクトなのだ。
■stateのオブジェクト化とスプレッド構文が組み合わさって動く時の仕様
ここで、stateの動きを確認すべく、buttonのonClickで状態関数に変化を与える。
import { useState } from "react";
export default function App() {
  const [state, setState] = useState({
    pip: false,
    playing: true
  });
  const { pip, playing } = state;
  const handle = (e) => {
    setState({ pip: true });
  };
  // console.log(state);
  const arr = [1, 2, 3]
  // const arr1 = ...arr
  console.log(state)
  return (
    <div className="App">
      <p>あああ</p>
      <button onClick={handle}>ボタン</button>
    </div>
  );
}
ボタンを押す前のconsole.logは
{pip: false, playing: true}
と定義してあるオブジェクトが予想通り出力されるが、ボタンをクリックすると
{pip: true}
と、playingのプロパティが消えてしまう。
これは、
  const handle = (e) => {
    setState({ pip: true });
  };
を
  const handle = (e) => {
    setState({...state, pip: true });
  };
としてやる必要があるのだ。
このことは、オブジェクトリテラルでのスプレッド構文という仕様が、強く関わっている。
スプレッド演算子、レストパラメーター、分割代入
■スプレッド演算子
スプレッド演算子(...)は、配列の全ての値を一括で「展開」できる、という機能である。
push()について復習。配列やオブジェクトは「参照型」。値そのものではなく、値への参照を持っている。参照先のアドレスが変わらなければ、メモリの中身である配列やオブジェクトの中身を変更することができる。
よって、以下の例で、push()を使って、activeHobbiesに配列を追加するとしたら、
const hobbies = ["Spotrs", "Viking", "Razicon"];
const activeHobbies = ["Hiking"];

activeHobbies.push(hobbies[0], hobbies[1], hobbies[1]);

console.log(activeHobbies);
>>>['Hiking', 'Spotrs', 'Viking', 'Viking']
となる。
これを、スプレッド演算子(...)を利用すると、
const hobbies = ["Spotrs", "Viking", "Razicon"];
const activeHobbies = ["Hiking", ...hobbies];

console.log(activeHobbies);
>>>['Hiking', 'Spotrs', 'Viking', 'Viking']
と記述量が大きく減る。
スプレッド演算子(...)は、配列だけでなく、オブジェクトにも使える。
const person ={
    name: "shingo",
    age: 46
}
const person2 = {
    ...person
}

console.log(person);
console.log(person2);
>>>{name: 'shingo', age: 46}
>>>{name: 'shingo', age: 46}
こうすることで、簡単にオブジェクトも中身をそのまま複製できる。
■レストパラメーター(残余引数=残りのパラメーター)
今までは、あらかじめ「決まった数の引数」を受け取る関数を書いてきたが、「任意の引数」を受け取れるようにするにはどうしたら良いか?
そこで活躍するのが、レストパラメーターである。
例えば
const add = () => {

}

const addedNumbers = add(1, 7, 89, 4, 73);
console.log(addedNumbers);
このような任意のパラメーターを受け取る関数を考える時、どのようにすれば良いか?
そこで活躍するのがスプレッド演算子(...)。スプレッド演算子は、パラメーターを渡すときだけでなく、受け取る時にも使うことができる。
const add = (...numbers) => {
}
このようにして、受け取りたい値を配列にして渡すことができる。配列名は任意で大丈夫。
この関数に渡されたパラメーターが、全て一つの配列にマージされて、一つの関数に渡される。
つまり、「1, 7, 89, 4, 73」が[1, 7, 89, 4, 73]として渡されて、... で展開される、という流れになる。
さらに、typescriptの場合は
const add = (...numbers: number[]) => {

}
とnumberの配列と型を指定する。
これで、numbersを数字の配列として扱うことができる、という流れである。
関数の中身を考える。合計値を計算することを考える。
一つはforを使い、中身をループさせて合計するやり方。
もう一つはreduce()を使って、配列の中身を何らかの一つの値にするやり方。
const add = (...numbers: number[]) => {
    numbers.reduce(() = {}, 0)
}
reduceの一つ目の関数は、計算を行う関数、二つ目は初期値。
これを、accumulator(蓄積した結果)とcurrentValue(現在の値)という引数を使って、計算結果を返す。
const add = (...numbers: number[]) => {
    return numbers.reduce((accumulator, currentValue) => {
        return accumulator + currentValue;
    }, 0)
}
const addedNumbers = add(1, 7, 89, 4, 73);
console.log(addedNumbers);
これが「レストパラメーター」である。
今回は「任意の引数」を受け取る例だったが、決まった数の引数であれば、タプル型と組み合わせて使うと効果的。
例えばこのように。
const add = (...numbers: [number, number, number]) => {
    〜略〜
}
■分割代入(デストラクチャリング)
ここでも、スプレッド演算子(...)が活躍。
配列の分割代入は以下になる。
const hobbies = ["Spotrs", "Viking", "Razicon", "Cooking", "Racing"];
const [hobby1, hobby2, ...restHobbies] = hobbies;

console.log(hobby1)
console.log(hobby2)
console.log(...restHobbies)
>>>Spotrs
>>>Viking
>>>Razicon Cooking Racing
と、分割できる。
次はオブジェクト。
const person = {
    firstName: "shingo",
    age: 46
}
const {firstName, age} = person;

console.log(firstName);
console.log(typeof(firstName));
>>>shingo
>>>string
と出力できる。
このことは、オブジェクトを変数(この場合はconst<定数>)に分割して格納することができる、ということを示している。
また、名前を変更できる。
const {firstName:changeName, age} = person;
このようにすることで、firstNameというconst(定数)名から、changeNameという定数名に変更できる。